Struggling to understand the complex journey of your custom boxes? This lack of clarity can cause delays and stress. I'll explain the entire process from start to finish.
Managing custom book-style rigid box production involves a clear, sequential process. We start with your approved design, prepare the greyboard and wrap paper, then print and assemble. After strict quality checks, we pack and ship your order, handling all logistics until it reaches you safely.

It's a journey I've personally overseen thousands of times. Seeing a simple sheet of paper transform into a stunning, functional box is still exciting after 16 years. But to really grasp how we ensure quality and efficiency, we need to look closer at the foundation. Let's start with the basics of how these impressive boxes are actually constructed, step by step.
How are rigid boxes made?
Ever wonder how rigid boxes get their sturdy, premium feel? It's not simple folding. I'll show you the specific construction methods that create that high-end quality.
Rigid boxes are made by wrapping and gluing a high-quality printed or colored paper over a thick, dense paperboard, often called greyboard. This process creates a durable, non-collapsible structure with sharp, clean edges, giving it a premium look and feel unlike standard folding cartons.

The magic of a rigid box lies in its two-part construction. Think of it like a skeleton and skin.
The Core Structure: Greyboard
The foundation of any rigid box is the greyboard. This isn't your typical cardboard. It's a highly compressed, dense paperboard that provides the signature strength and, well, rigidity. We take large sheets of this greyboard and cut them precisely to the dimensions of the box base and lid. For those perfect, sharp 90-degree corners, a technique called V-grooving is essential. A machine cuts a V-shaped channel into the board, allowing it to be folded without crushing the material. This is a key detail that elevates the final look. I remember a client who couldn't believe the difference V-grooving made; it turned their standard box into a luxury item.
The Outer Wrap: Paper and Finishing
The "skin" is the printed or decorative paper that wraps around the greyboard core. This is where the branding comes to life. The paper is printed first, then often laminated (matte or gloss) for protection. Special finishes like foil stamping, embossing, or spot UV are also applied at this stage. The finished wrap is then carefully glued and applied to the cut greyboard pieces. This is a meticulous process, whether done by automated machinery for large runs or by hand for highly complex designs. It's the perfect fusion of strength and beauty.
What is the process of making boxes?
Curious about the exact factory workflow for your box design? Not knowing the steps can make project planning difficult. Let's walk through our production line process together.
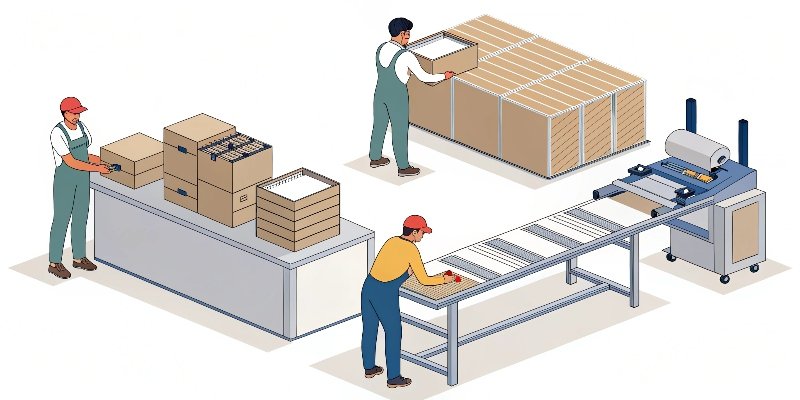
The process starts with pre-production checks1. Then, we move to printing the wrap paper2 and die-cutting the greyboard3. Next is assembly, where the wrap is glued to the board. It ends with quality control4, packing, and preparing the finished boxes for shipment to the client.

Transforming a design file into thousands of physical boxes is a disciplined, multi-stage operation. I've spent years refining this flow at Giftspack to maximize quality and efficiency for clients like you.
Pre-Production and Material Prep
First, your design file goes through a pre-press check. Our team ensures all colors, lines, and finishes are correct for production. We create printing plates and die-cut forms based on these final proofs. At the same time, we source and cut the raw materials: massive rolls of wrap paper2 and thick sheets of greyboard. Everything is prepared and staged, ready for the main event. Getting this stage perfect prevents costly errors later on.
The Production and Assembly Flow
Next, we move to the main production floor. Here’s a simplified breakdown of the key stages:
| Stage | Description | My Key Focus |
|---|---|---|
| Printing | The wrap paper2 is printed with the approved design using large offset printing machines. | Color accuracy and consistency across the entire run. |
| Finishing | The printed sheets go through lamination5, foil stamping, or other special processes. | Perfect application without bubbles or misalignment. |
| Die-Cutting | The greyboard is cut and grooved to the exact shape of the box components. | Precision cuts for clean folds and perfect assembly. |
| Wrapping/Assembly | The printed wraps are automatically or manually glued and formed around the greyboard pieces. | Tight corners and seamless adhesion of the wrap paper2. |
| Final QC | Each finished box is inspected for flaws before being packed. | Checking for glue spots, scratches, or structural issues. |
How to make rigid packaging6?
Want to create truly impressive rigid packaging6? A great visual design is only half the battle. You have to get the structure and materials right for it to work.
To make effective rigid packaging6, start with a solid structural design7. Choose the right greyboard thickness8 for durability. Then, select a wrap paper2 and finishing techniques like lamination5 or foil that match your brand. Finally, ensure the assembly process is precise for a premium finish.

As a designer, your input is crucial long before the factory starts its machines. Making the right choices early on is the key to successful rigid packaging6. I always tell my design partners that they are the architects of the final product.
Key Structural Decisions
Your first job is to define the structure. This goes beyond just the dimensions. You need to decide on the style of the box, like the book-style boxes we are discussing, or perhaps a classic lid-and-base style. The most important choice here is the thickness of the greyboard. A heavy luxury item needs a thicker, 2-3mm board for protection and a premium feel. A lighter product might only need a 1.5mm board. I once had a project where the client insisted on a thinner board to save costs, but the product was heavy. The boxes just didn't feel substantial, and they had to redo the order. It's a lesson in balancing cost with the customer's perceived value.
Choosing Materials and Finishes
Next, you select the "skin." You can choose from standard art paper, which is great for high-quality printing, or textured specialty papers for a unique tactile experience. Then come the finishes. Will it be a soft-touch matte lamination5 or a shiny, vibrant gloss? Do you want to add an embossed logo9 that stands out, or a debossed one for a subtle, elegant effect? These choices define the final look and feel and are critical for aligning the packaging with the brand's identity.
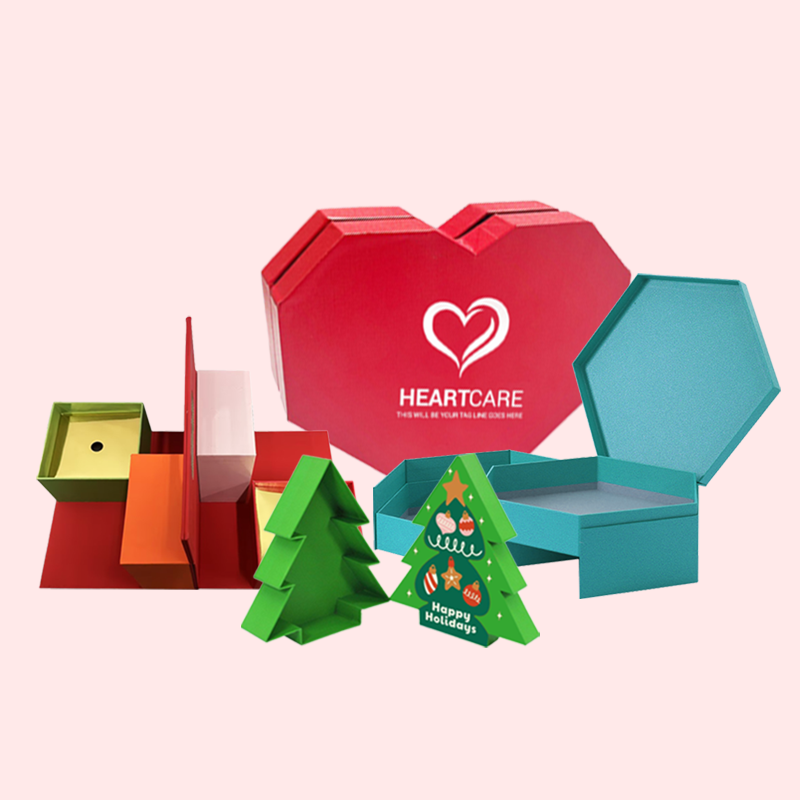
What are the components of a rigid box?
Do you know the specific parts that make up a rigid box? Not knowing the terms can make technical discussions with your supplier confusing. Let's dissect a box together.
The main components of a rigid box are the greyboard (the structural core) and the wrap paper2 (the outer printed layer). Other common components can include magnets for closure, a ribbon pull, or a custom insert made from foam, paper, or plastic to hold the product securely.

Understanding the anatomy of a rigid box helps you communicate your vision precisely. As a designer, knowing these terms allows you to specify exactly what you need. After 16 years, I find that clear communication at this stage saves everyone time and money.
The Core and The Cover
Every rigid box has two fundamental components. First is the greyboard, which forms the sturdy, unbendable structure of the base and lid. Second is the wrap paper2, which is the printed and finished sheet that gets glued over the greyboard, carrying all the branding and graphics. These two parts work together to create the basic box.
Functional and Decorative Enhancements
Beyond the basics, several other components can be added to enhance functionality and aesthetics. These are the details that often create a memorable unboxing experience10.
| Component | Purpose & Common Materials |
|---|---|
| Closure System | To keep the box securely shut. Most common are hidden magnets. Sometimes a ribbon tie or an elastic band is used. |
| Interior Insert | To hold the product in place. Materials include die-cut paperboard, high-density EVA foam for a premium feel, or blister/thermoformed plastic for complex shapes. |
| Pull Tabs | To help open the box or lift out an insert. Usually made from grosgrain or satin ribbon. |
| Thumb Notches | A small, die-cut semi-circle on the side of a lid or base. It makes opening the box easier for the user without needing a ribbon. |
Conclusion
From design to delivery, managing the creation of custom rigid boxes is a detailed process. Understanding each step ensures a high-quality, successful final product that perfectly represents your brand.
-
Understanding pre-production checks can help ensure your packaging process is error-free and efficient. ↩
-
Explore the importance of wrap paper in packaging to enhance your product's presentation and branding. ↩ ↩ ↩ ↩ ↩ ↩ ↩
-
Learn about die-cutting techniques to achieve precise shapes and enhance the quality of your packaging. ↩
-
Discover how quality control processes can improve product reliability and customer satisfaction. ↩
-
Explore how lamination can enhance the durability and aesthetics of your packaging. ↩ ↩ ↩
-
Find out the best practices for creating rigid packaging that stands out and protects your product. ↩ ↩ ↩ ↩
-
Understanding structural design is crucial for creating packaging that is both functional and visually appealing. ↩
-
Learn how the thickness of greyboard impacts the durability and perception of your packaging. ↩
-
Discover how an embossed logo can elevate your brand's packaging and create a premium feel. ↩
-
Explore strategies to enhance the unboxing experience, making it memorable for your customers. ↩